What is Virtualizor? (Apakah yang dimaksudkan dengan Virtualizor)
Virtualizor is a powerful web based VPS Control Panel. It supports OpenVZ, Xen PV, Xen HVM, XenServer and Linux KVM virtualization. Admins can create a VPS on the fly by the click of a button and endusers can start, stop, restart and manage their VPS.
(Virtualizor adalah Panel Kawalan VPS berasaskan web yang kuat. Ia menyokong OpenVZ, Xen PV, Xen HVM, XenServer dan Linux KVM virtualization. Admin boleh membuat VPS dengan hanya klik butang dan endusers boleh dimulakan, dihentikan, dimulakan semula dan mengurus VPS mereka.)
Managing VPS (Pengurusan VPS)
All VPS are provided with Virtualizor control panel access for clients. To manage your VPS find the control panel URL you will receive in the email sent to you.
(Semua VPS disediakan dengan akses panel kawalan Virtualizor untuk pelanggan. Untuk menguruskan VPS anda, cari URL control panel yang akan anda terima melalui e-mel yang dihantar kepada anda.)
- Login with the username and password provided in email.(Masuk nama pengguna dan kata laluan yang disediakan dalam e-mel.)
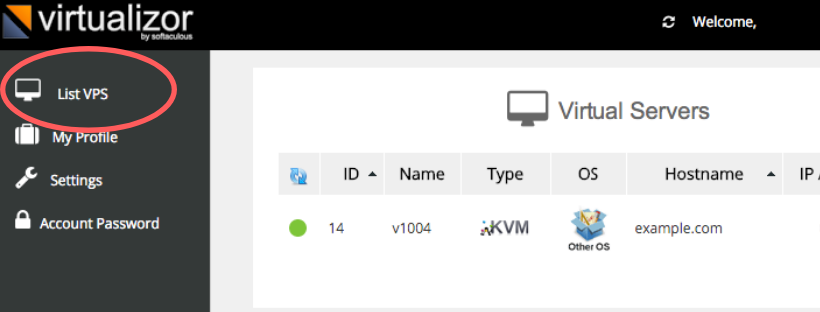
- Click on List VPS. (Klik pada Senarai VPS.)
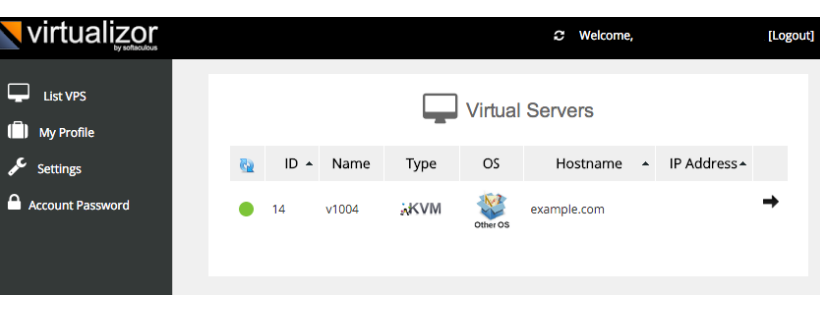
- Then click on the arrow next to VPS you want to manage. (Kemudian klik pada anak panah di sebelah VPS yang anda ingin uruskan)
Changing VPS Password (Menukar kata laluan VPS)
To Change Password of your Unix or Windows VPS, first you need to login to your control panel account and then follow this guide.
(Untuk Tukar Kata Laluan Unix atau Windows VPS anda, anda perlu log masuk ke akaun panel kawalan anda dan kemudian ikuti panduan ini.)
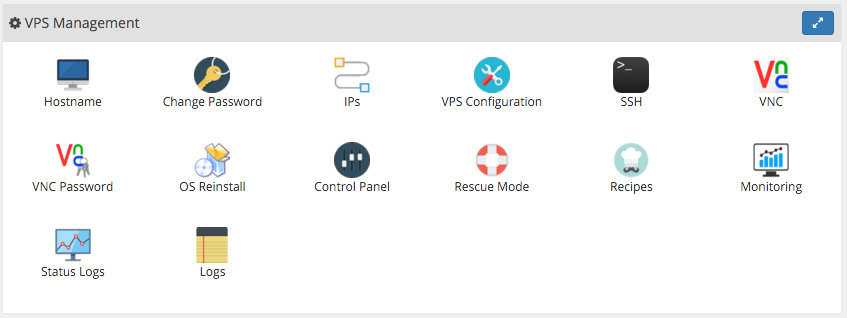
- Go to VPS Management (Pergi ke Laman VPS Management)
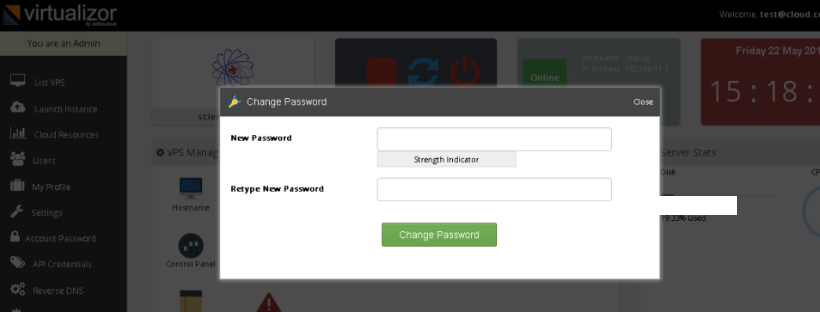
- Click on 'Change Password" (Klik pada 'Tukar Kata Laluan')
- Enter New Password and then click on "Change Password"(Masukkan Kata Laluan Baru dan kemudian klik pada "Tukar Kata Laluan")
- Your Root Password will be changed successfully (Kata Laluan Root anda akan ditukar)
Note/Nota:
- Password must contain atleast 3 of the following : An uppercase letter, a lower case letter, a number or a special symbol (Kata laluan mesti mengandungi 3 kriteria daripada yang berikut: Huruf huruf besar, huruf kecil huruf, angka atau simbol khusus)
- Only administrator account password can be changed for windows VPS. The VM must be rebooted for the password changes to take effect.(Kata laluan akaun Admin hanya boleh ditukar untuk window VPS. VM mesti disambung semula untuk melaksanakan perubahan kata laluan)
Accessing VNC (Mengakses VNC)
To connect via VNC, first log in to your control panel (Untuk menyambung melalui VNC, log masuk ke panel kawalan anda)
- You will see a screen similar to following (Anda akan melihat skrin seperti berikut)
- Click on the arrow you will see a screen similar to below (Klik pada anak panah pada skrin yang sama seperti di bawah)
- Click on the VNC option and then click on HTML 5 VNC client (Klik pada pilihan VNC dan kemudian klik pada klien HTML 5 VNC)
- You will now be able to use change settings on VPS (Anda kini akan dapat menggunakan tetapan perubahan pada VPS)
Enabling root SSH login (Membolehkan log masuk root SSH)
By default the SSH access to root account is disabled for security reasons. However if you would like to turn it on you can follow the guide (Akses SSH ke akaun root tidak dibenarkan atas sebab keselamatan. Walau bagaimanapun, jika anda ingin menghidupkannya, anda boleh mengikuti panduan tersebut)
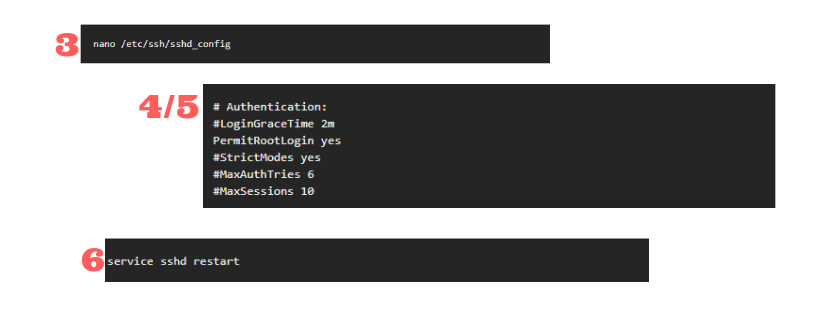
- Login to your control panel and open VNC (Masuk ke control panel anda dan buka VNC)
- As root, edit the sshd_config file in /etc/ssh/sshd_config (Sebagai root, edit fail sshd_config di / etc / ssh / sshd_config)
- Use the command nano /etc/ssh/sshd_config (for editing) (Gunakan arahan nano / etc / ssh / sshd_config (untuk diedit))
- Find the line PermitRootLogin (without-password) (Cari baris PermitRootLogin (tanpa kata laluan))
- Change it to PermitRootLogin (yes) (Tukar ke PermitRootLogin (yes))
- Then restart the ssh with command service ssh restart (Kemudian mulakan semula ssh dengan arahan service ssh restart)
How to activate Windows Trial (Bagaimana untuk mengaktifkan Windows Trial)
We require clients to bring their own license with VPS, however if you would like to use windows trial with our VPS you can follow this guide (Kami memerlukan pelanggan yang mempunyai lesen dengan VPS, tetapi jika anda ingin menggunakan percubaan windows dengan VPS kami, anda boleh mengikuti panduan ini)
- Login to control panel (Log masuk ke panel kawalan)
- Click VNC (Klik VNC)
- Click on HTML5 Client (Klik pada HTML5 Client)
- Click Start, and then click Command Prompt (Klik Mula, dan kemudian klik Command Prompt)
- For Windows 2012 Type slmgr.vbs /rearm and then press ENTER (Untuk Windows 2012 Type slmgr.vbs / patah balik kemudian tekan ENTER)
- Restart the server through control panel or through windows menu (Mula semula server melalui panel kawalan atau melalui windows menu)
- For Windows 2008 Open Server Manager, Click on Activate Windows then Click Next and finish the dialogue box (Untuk Windows 2008 Open Server Manager, Klik Aktifkan Windows kemudian Klik Seterusnya dan selesaikan kotak dialog)
- Your trial will be activate now (Percubaan anda telah diaktifkan)
If you are unable to do this or receiving any errors please open a support ticket we will arrange this for you (Jika anda tidak dapat melakukan ini atau menerima apa-apa kesilapan, sila buka tiket sokongan dan kami akan sediakan untuk anda)